top

1 2 3 4 1 3 2 4 5

Friday 31 July 2015

Update and taking a break...


As the title states, I’m taking a little break from blogging and YouTube. I’ve decided to give myself the month off to re-charge my batteries and come back in September with fresh content. I adore blogging and making videos but recently I realised I’ve been posting two blog posts and 1-2 videos a week for 14 months solidly and I’m actually quite tired! Everyone deserves a little rest and I don’t want to get to the stage where I’m just churning out utter rubbish just to meet my own OCD deadlines or worse- crash and burn. 

If you follow me on social media, you’ll know I recently went to the amazing festival that is Secret Garden Party. I really wanted to get that up before this break but in order to do it justice I’m pushing it back to September so keep your eyes peeled for that one. I’m also heading to Summer in the City in August which I’m SO excited about and I’ll no doubt be vlogging it. How can I not vlog a YouTube event!? So this will also be up early September for you all.

Writing this feels like one of those awkward it's not you it's me break ups but I honestly just need some time to let my small brain rest! I even made an awkward YouTube video about it *cringes.*


I hope you understand and have an amazing rest of the summer. I shall see you in September with exciting autumnal stuffage.

Big love,


Tuesday 28 July 2015

Empties Video!


So today I thought I'd try a different type of video and do an empties video. I've been quite addicted to these on YouTube recently and love to see what people will use til the bitter end and whether or not they'd re-purchase it in the future. I must admit it felt a bit strange keeping empty bottles of things in a box, my inner neat freak was screaming! Anyway I hope you enjoy the video below:


What are you forever using up?


Friday 24 July 2015

Pinterest- Tips for your inner pinner


Like many people, I have an addiction to Pinterest . It’s a brilliant and useful tool to find inspiration for projects and things you’re interested in. I recently had the privilege of attending a Pinterest workshop where I discovered I’d been using it all wrong! So today I thought I’d share with you some tips and ideas I learnt to feed your inner pinner!

Get your pins Discovered

If you’re a blogger or have a website, one of the simplest and easiest ways to get your pins discovered is with a “Pin It” button on your website. The bigger the better quite frankly as this will encourage your readers to pin your content, thus others discovering your content. Pins and Repins can also be discovered through the home feed of your followers.


 Make your pins helpful

Everybody loves a helpful pin! From DIYs to life hacks, they really are awesome. Giving detailed descriptions is also really helpful for example, a pin of a rustic wedding invitation with the description “wedding invitation” isn’t very helpful compared to “the perfect DIY wedding invitation for a rustic bohemian style country wedding. Made from DL card and paper doilie” Which one is more helpful? People searching for DIY rustic wedding invites will find the second description much more helpful and it’s much more searchable this way. Text overlays are another great way to create a helpful pin. It instantly tells you what it is, thus whether or not it is relevant and helpful to what a person is searching for.


Link your Pins

There is nothing more frustrating than when you find an amazing pin but there’s no link to where you can buy it or a tutorial on how to make it. Again if you’re a blogger that does DIYs and pins them, or a website selling a product, linking your pin can drive more traffic to your site! If you don’t source your images, you’re not making them a discovery tool which is the whole point of Pinterest…


Vertical Pins

Pins that are made vertically flow much better for a Pinterest experience. This is because Pinterest organizes images vertically, stacking them one on top of the other in a grid. As most people use Pinterest on their mobile phones, vertical Pins just look better than horizontal ones. They're particularly great for DIY and how-to pins.


Think about your titles and descriptions

Be authentic in your descriptions and think about the titles for your boards. Consider what other pinners search for. No one ever searches for example “my wedding” do they? Instead try “rustic wedding ideas” or “country wedding inspiration”, it’s much more searchable. Hashtags are pointless. They’re irrelevant on Pinterest just so y’know.

Feed your inner pinner

Pin on a regular basis. This will keep your audience engaged! And don’t worry about followers. Pinterest isn’t a social media tool, people are more interested in your pins than your actual profile. It’s nothing personal! Be creative and theme boards, dragging current and this seasons boards to the top of your profile and out of season boards (i.e. Christmas) to the bottom of your profile. Who wants to see Christmas in July? The best boards contain stunning imagery that grabs people’s attention. Show what inspires your from people to places, objects to ideas. There are so many options and ways to get creative.


So those are the tips and knowledge I picked up from the Pinterest workshop. I hope they've helped to give you ideas and information on the proper way to pin!

If you want to check out my Pinterest it's here:


Have you fed your inner pinner today?


Tuesday 21 July 2015

Summer Beauty Favourites

Hello hello hello! It’s that season again where I talk beauty favourites so lets start shall we?


Green people organic fruit scrub exfoliate

As summer is here an exfoliator is necessary to keep your skin looking fresh and smooth. I’ve been loving this organic one from Green People with its fresh citrus scent and gentle exfoliation. Its really effective at removing dead skin cells without completely stripping your face of its essential oils. Another big plus is that it’s organic and free from parabens, alcohol and other nasties so my skin is very happy!

This works Perfectlook skin miracle

As you can see this product has been used A LOT and I’ve got a lotta love for it. This instant tinted skin perfector hydrates and brightens your skin whilst giving you lots of vitamin goodies that your skin will thank you for. The tint gives you a subtle hint of a summer glow which is perfect for days when you don’t fancy heavy coverage. A touch of this and some bronzer is perfect for a summer no make-up make-up look!

Argan oil hydrating hair mask & Argan oil heat defence leave in spray

You may have seen my post on this hair mask earlier on in the summer. It really is the tits for giving you silky soft locks at a crazily cheap price of 99p! I was so impressed that I had to try the heat defence leave in spray too. It has that same lovely smell and does a great job of protecting my locks from being frazzled. Winner!

Body Shop Honey Bronze bronzing powder

No summer beauty favourites would be complete without a mention of some bronzer! This body shop honey bronzer is the perfect formula, being matte so no crazy shimmer going on bright sunny days (what are those again?) I also love the packaging and the design. I know it’s not an important factor but it is pretty. Ooh!

Body shop All-In-One Instablur

If you want a primer that’s value for money, keeping your make-up in place and makes your skin feel amazing- this is the one. I have been loving this for a good few months now and can safely say it does the job and bloody well too. With seriously oily skin that has a habit of letting my make-up slide off my face I was sceptical of the Instablur but it helps reduce shine whilst keeping my make-up firmly in place for a good 12 hours. At £14 I’d say it’s pretty damn reasonable and I’ll even say it’s as good as Clarins Beauty Flash Balm. Yup, I went there! 


So these are the products I'm loving for the summer months and feel really benefit skin and hair in the hotter weather! What are you loving?


Friday 17 July 2015

Craft a home of Happiness- a round up of recent crafts


Some of you may or may not be aware that I moved house at the beginning of January. It was quite a big move, as I’d previously lived in Cyprus until September 2014, then moved into my mum’s temporarily until our house was ready. To say this was a stressful time is an understatement, what with Chris being away in the Falklands and me having to do the move with just my Dad to help out (thank you Dad you life saver), but we’re very much settled in our little home now and I’ve been doing my best to make it as cosy as possible.

As a keen crafter I love making bits and pieces, so adorning our house with things I’ve made on the cheap is something I really enjoy and find very satisfyig. Chris and I don’t want to splash lots of cash but certainly want to project our personalities on the place so here’s some things I’ve been crafting..

It’s OK Banner

You may have seen this banner before as I did a tutorial on it back in March. I’d been lusting after one for quite some time but every time I’d go to buy one, they were never in stock! Frustrated I decided to create my own (which was much more satisfying), making it a bit smaller than the original- perfect for this little corner of our living room.


 Chartreuse Canvases

Sooo we’ve got this bedding… Could I find any art work to match it? No. Or if I did, did we like it enough or thought it was worth the price tag? No… We took to Pinterest and came across these wonderful quotes and typography (originals here and here) and I got out my watercolours and gave it my best shot to re-create our own. We changed up the colours and went for chartreuse, greys and blacks. It took me so long to find a proper word for “yellowey green limey but not too green or too yellow” and chartreuse is the word!  I must admit I was pretty chuffed and relieved at how they came out and Chris praised me too- yay! The canvases I picked up at my local Factory Shop- two for £6!


Polka dot table cloths and pretty pretty curtains

Now I’m no sewing expert, in fact I’m quite the novice!  Thankfully I have a Mothership with much more expertise and knowledge to guide me so when I told her I wanted to re-vamp the kitchen a bit with curtains and a tablecloth she was happy to help. The table cloth and curtain material both came from Dunelm and are just adorable! The table cloth was incredibly easy to make. Measure your table, allow some excess and have the material cut- done! It’s oilcloth so it doesn’t fray and is easy to wipe over too. Sorted! The curtains were a bit trickier but so satisfying to make and now I know how to make them I’ll definitely have another go in the future.


DIY Dog Bed

Our home wouldn’t be complete without our hound Harry. He’s such a big part of the Rayment household and I wanted to make him a lovely dog bed whilst in keeping with our living room. I came across this lovely fabric (which if you look closely has a dog pattern on) and thought it was perfect. I did another tutorial on how to make this (here) but it’s crazy simple and I guarantee it’s something you could do! He loves it as I made sure it was a nice big bed for him to stretch out on and I love it because it’s not a typically garish dog bed- yay!


Sundae Candle

Back in April/ May time I took part in the Craft Blog Club’s spring clean gift swap.  In a nutshell the challenge was to spring clean some old craft supplies whilst creating a secret gift for another craft blogger. I made a sundae candle for Robyn of Simple Little Pieces plus more (see post here) and made an extra one in case I cocked up the first one! Thankfully her candle came out lovely, leaving me with one too which is a cheery fun decoration for our kitchen. It’s confused plenty of our friends mwahahaha…


Craft bench make over

Having the perfect craft area is crucial for spreading out materials and having space to create and again I couldn’t find anything I liked within my price range *sobs* so yet again I rolled up my sleeves and decided to make my own out of materials I mostly already had. My desk started off as a teeny tiny laptop desk with a shelf balanced on top. After sourcing the same desk, I drilled another spare shelf top on top and with a lick of paint I created a long craft bench. One end is aimed at being office like, with laptop and printer whilst the other I leave clear to use my sewing machine and create other craft projects. It was super cheap to devise and I think the chalk based paint helps it fit with our shabby chic guest room. I’m planning on doing a craft room post in the near future so watch this space…


And those my friends are a few little ways I've made our house a little bit more homely on the cheap whilst incorporating crafts! It’s so much fun and god do I get a kick out of it when people ask “where did you get that from?” and I can reply, “I made it myself.”

 What have you made for your home?


Tuesday 14 July 2015

A Crafternoon at Hotter with Create and Craft TV


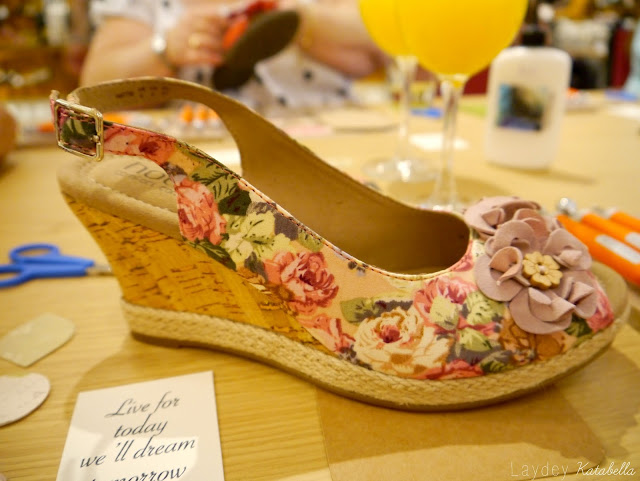
If you've known me a while or have followed my blog you may well know that two of my greatest loves are shoes and crafts, so when Hotter invited me to a craft workshop with Create and Craft TV I instantly said yes! 
craft workshop at Hotter shoes Peterborough with create and craft tv

With the Mothership (AKA Mum) as my plus one, we trotted on down to Hotter in Queensgate, Peterborough and were greeted by the wonderful Hotter team and introduced to crafter and presenter Mel Heaton plus the team behind Create and Craft TV.
craft workshop with create and craft tv

The evening started off with bucks fizz and delicious nibbles followed by a talk on shoes from the Hotter team, explaining how comfortable and well made their shoes really are. Lots of styles were passed around from the Savannah sandals to the Hattie wedges to be oohed and arred at as well as the materials they use to give their shoes that comfort concept. Mum has always been an avid Clarks enthusiast but by the end she turned to me and said "why haven't I been here before?"
craft workshop at Hotter shoes Peterborough

craft workshop at Hotter shoes Peterborough

craft workshop with create and craft tv

Craft workshop at Hotter shoes Peterborough

craft workshop at Hotter shoes Peterborough

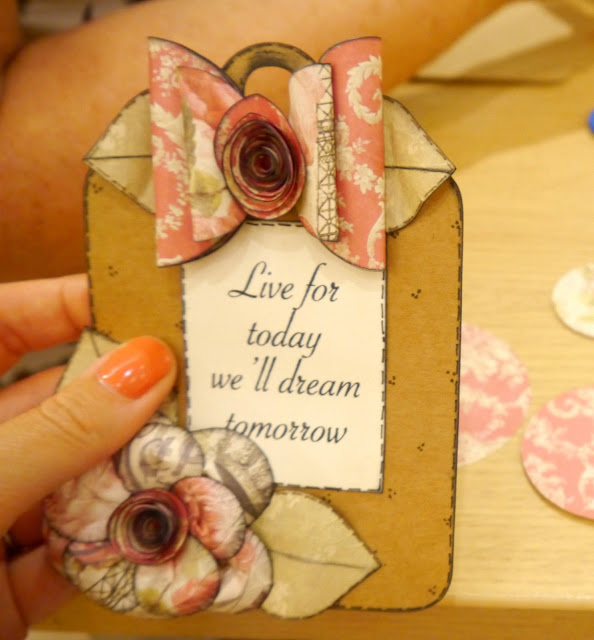
Then came the crafting… We were each given tools and various sizes of patterned paper to work with which Mel revealed were going to create a 3D gift tag. When I first looked at the vintage inspired tag my first thoughts were “ooh this is pretty” followed by “this looks hard!” but with the instructions from Mel, everything slowly started to come together to make a really effectively and beautiful gift tag. I got the chance to chat with Mel whilst crafting away and she admitted she was never particularly artistic at school but loves to make things, which just goes to show that anyone can have a go!
craft workshop with create and craft tv

craft workshop with create and craft tv

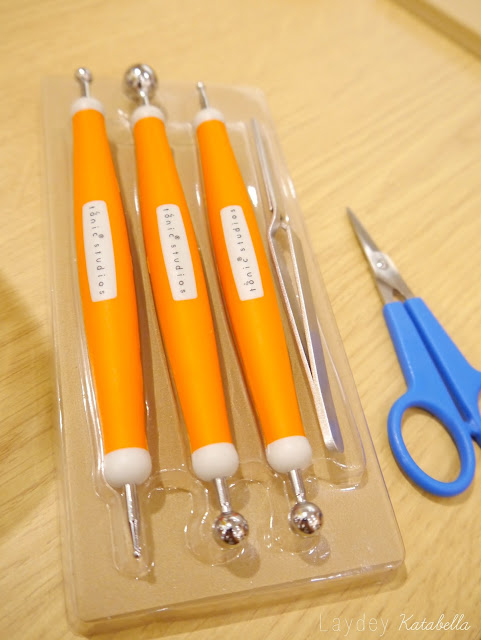
tonic floral crafters tool set


The tools we used were the floral crafters tool set from Tonic which I'd never come across and initially thought they could be giant nail art tools! Thankfully with a demo from Mel we were shown how to use them on the foam pad (which comes with the kit) to manipulate our circular card pieces into 3D petals and leaves. 


craft workshop with create and craft tv


To add to the 3D effect of the paper layers, we went round the very edge of each piece with a foam pad dipped in ink. This really emphasised the edges and helped them to stand out from one another- something I would never have thought to do.  
craft workshop with create and craft tv

craft workshop with create and craft tv

To form the flower centres we cut some of the circular paper into spirals and rolled them up into the centre, securing with glue. We then used the tweezers in the tool set to hold them securely in place whilst they dried. This again was another little trick I picked up for future use.

craft workshop with create and craft tv

craft workshop with create and craft tv

During the workshop the Create and Craft TV team were snapping away with cameras (which made me glad I’d done a manicure) and asked me to say a few words for the camera. It’s so bizarre being filmed by someone else when you’re used to filming for yourself; editing out the parts you mess up/ don’t like but here’s how I got on and surprisingly for myself, I don’t think I did too bad! (I'll insert the footage or link to it once it's live.)
When the workshop had finished, the final result was a beautiful gift tag which when broken down into stages was quite simple and fun to do. Everybody’s was slightly different due to the way each individual folded, cut and manipulated the paper, giving a unique twist to everyone’s work. I thoroughly enjoyed the craft workshop, picking up lots of new tips and tricks as well as feeling inspired to create more paper crafts in the future. Watch this space!


craft workshop with create and craft tv

Feeling rather pleased with ourselves, Mum and I had one last look at the shoes with Mum having her first Hotter moment! She chose the Tone shoes which of course are comfy and perfect for nurses. With nursing and being on her feet constantly, she found her perfect pair for comfort and stability.
All in all I had another fantastic evening at the Hotter store in Queensgate. (If you want to read about the first event click here. ) Both myself and Mum thoroughly enjoyed the craft workshop, both feeling inspired to create and craft more at home and to watch the Create and Craft TV channel which is on freeview channel 36. As always the Hotter team were also fantastic and I can’t wait get my hands on their upcoming autumn winter collection!
Once again I vlogged the event, this time with the help of Mothership so click the video below:


See you all again on Friday!


Friday 10 July 2015

Updated Room Tour


So today I thought I'd let you have a nosey around my bedroom. I personally love watching these videos a) because I'm nosey and b) they give me ideas and inspiration on storage and decor etc. I did my first ever room tour video back in 2012 which I've also linked down below in case you're interested. I've since moved but you may notice things from my first tour in the second video.

My updated room tour:


My first room tour: (I say casual far too many times in this, it makes me cringe watching it back!)


Do you love your bedroom?


Tuesday 7 July 2015

Running Race 4 Life - Tips from a marathon runner #high5wave

In 12 days time the 5k and 10k Race for Life event will be happening in Cambridge. Hundreds of women will be donning pink and running to help raise much needed funds to fight cancer. It's set to be a fantastic event with sponsors such as Scottish Power supporting the event with their High 5 Wave, turning 60,000 high fives into £35,000 for Cancer Research.

As the race itself is split into a 5k event and a 10k I decided to interview London Marathon 2015 runner Roger Holmes to get some tips and advice on running. If however you won't be running but want to donate, check out the end of this post for a fun photo way to get involved!


Roger has always been a keen runner, doing Cambridge and Peterborough Parkruns on a regular basis but had always wanted to run the London Marathon and follow in his mum's footsteps. His mum Gillian is also a keen runner and has completed numerous marathons over the years. I think it runs in the family, (ho ho ho I'm so very not funny.)


How did you start off your running training? Did you have a set goal per day or week?

I was doing a 5k park run every Saturday which helped. On top of that I'd try to fit in other runs as well as entering 10ks, half marathons and I even did a 20 mile race.

What mistakes can newbie runners make?

They start off on a run at a faster pace than they are used to. Also running a longer distance than they are used to too.

Why did you choose to run the London Marathon?

I'd always wanted to do it and my mum has done it several times so I wanted to follow in her footsteps so to speak!

How did you motivate yourself to push yourself?

I was doing it for charity so I didn't want to let down all my sponsors and the charity. I also wanted to complete it to say I've done it!

A lot of runners have that dreaded moment of hitting "the wall." How did you overcome that?

I just had to push on and not let everyone down that had backed me! I also wanted that medal so badly!

What inspires you as a runner?

Seeing how fast I can do a certain distance in and then seeing if I can beat it the next time. Also just getting miles on my feet and racking them up!

What advice can you give to the Race For Life runners?

Just enjoy it! Don't start off too fast at the start and pace yourself. Don't drink loads of water before the race, sip just enough. If you start feeling tired, just think of the people that have supported you and that you can't let them down.


Thank you Roger for some fantastic tips and advice on the running front. It's always good to seek advice from experienced runners.

Now, as I said earlier to you about donating via photos, you can help Scottish Power reach their high five target by adding a photo or video5 to the High 5 Wave, by liking their Facebook page, sharing a video or image, nominating a friend to high five or by getting involved with activities at their High 5 Wave marquee at the Cancer Research UK Race for Life event attended by Scottish Power in Cambridge on 19th July.

Or if you're feeling really awesome, you can run and be part of the High 5 Wave!

Are you running Race for life?


Related Posts Plugin for WordPress, Blogger...